Open the Preferences menu by looking for the gear wheel on the left of the screen, then select Spam as seen below: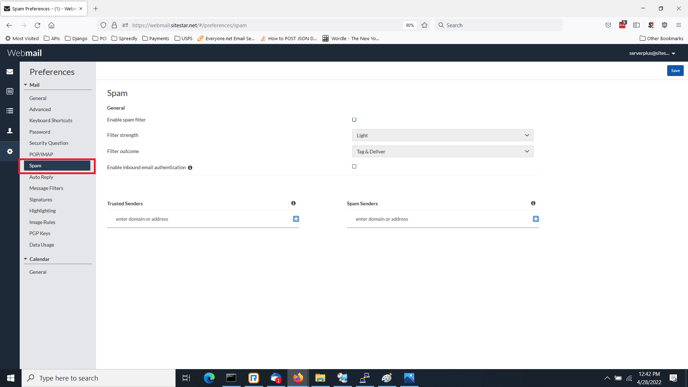
The Spam Preferences section allows you to set the spam filtering options for your email account.
Filter Strength - allows you turn on spam filtering and specify the level of filtering applied to mail marked as spam. Every email received through inbox is evaluated and assigned a point value by an automated filter, based on the message headers and each email's content. If the point total is over a specific value, the email is categorized as spam. The subject, message formatting, and message headers are all examined for "spam-like" features.
- Light: Light Filtering sets the spam filter to a low sensitivity level. This setting will let through more spam, but is less likely to accidentally identify legitimate email as spam.
- Standard (Recommended): Standard Filtering sets the spam filter to a high sensitivity level. This setting has a typical 95% to 99% success rate for discriminating between spam and legitimate email. This is the default setting.
- Aggressive: Aggressive Filtering sets the spam filter to a very high sensitivity level. This setting increases the chances that legitimate email will be classified as spam.
Note: While the Spam Filter is an excellent method to limit spam, there is the potential for legitimate emails to be classified as spam and deleted, if this feature is enabled.
Filter Outcome – sets the action to take when an email message has been identified as spam.
- Delete: This option will automatically delete all email flagged as spam. Emails classified as spam will not be delivered to your inbox and will be retrievable.
- Tag & Deliver: This option delivers all email flagged as spam to your inbox with “*****SPAM*****” added to the start of the subject line. You may sort these messages into another folder and delete them after review. *Tag and Deliver is the default setting.
- Quarantine: This option automatically places all email flagged as spam into a “Junk” folder.
To Set the Filter Parameters:
- In the General section, complete the following:
- Select Light, Standard or Aggressive from the Filter strength drop-down.
- Select Delete, Tag & Deliver or Quarantine from the Filter outcome drop-down.
- Select Inbound Email Authentication preferences.
- Click Save.
Enable Inbound Email Authentication
This is an added security measure that will check to ensure the sender is authorized to use an email address. This will target unauthorized users potentially impersonating email addresses that do not belong to them.
- Check SPF (Sender Policy Framework)
- Check DKIM (DomainKeys Identified Mail)
- Trusted senders bypass inbound email authentication checks
Trusted Senders
To add someone to the Trusted Sender list, click the Plus sign and enter the email of the sender. Add email addresses to this list you wish to be certain you receive e-mail from, regardless of pre-set spam configuration.
To Add a Trusted Sender:
Enter the full email or domain in the Trusted Senders field and click the Add icon.
Once added, the email will be listed under the Trusted Senders section.
Spam Senders
Add email addresses to this list if there are addresses you wish to be certain you never receive email from, no matter how you have configured the spam filter. With Trusted/Spam Senders lists, you can perform the following actions:
- Add a Trusted Sender by email address or domain
- Add a Spam Sender by email address or domain.
To Add a spam sender:
Enter the full email or domain in the Spam Senders field and click the Add icon.
The added email or domain will display under the list, along with any other entries.
Note: Entries in your Spam Senders list will be handled according to the filtering settings. For example, if you currently have your spam filter set to 'Deliver', all entries in the list will be automatically be marked as spam, regardless of their spam score, and delivered into your mailbox in the same fashion as other email determined to be spam.
To Remove a Sender from the Trusted or Spam Sender Lists:
- Hover over the contact you want to delete and click the Trashcan icon.
- In the Confirmation dialog, click Delete.